Print Orientation in 3D Printing: How It Decides Part Strength
The same 3D printed part can be several times stronger or weaker depending on how it is oriented. Learn how layers work and request a quote for strong parts.
Dennis
3Dennis
Contents
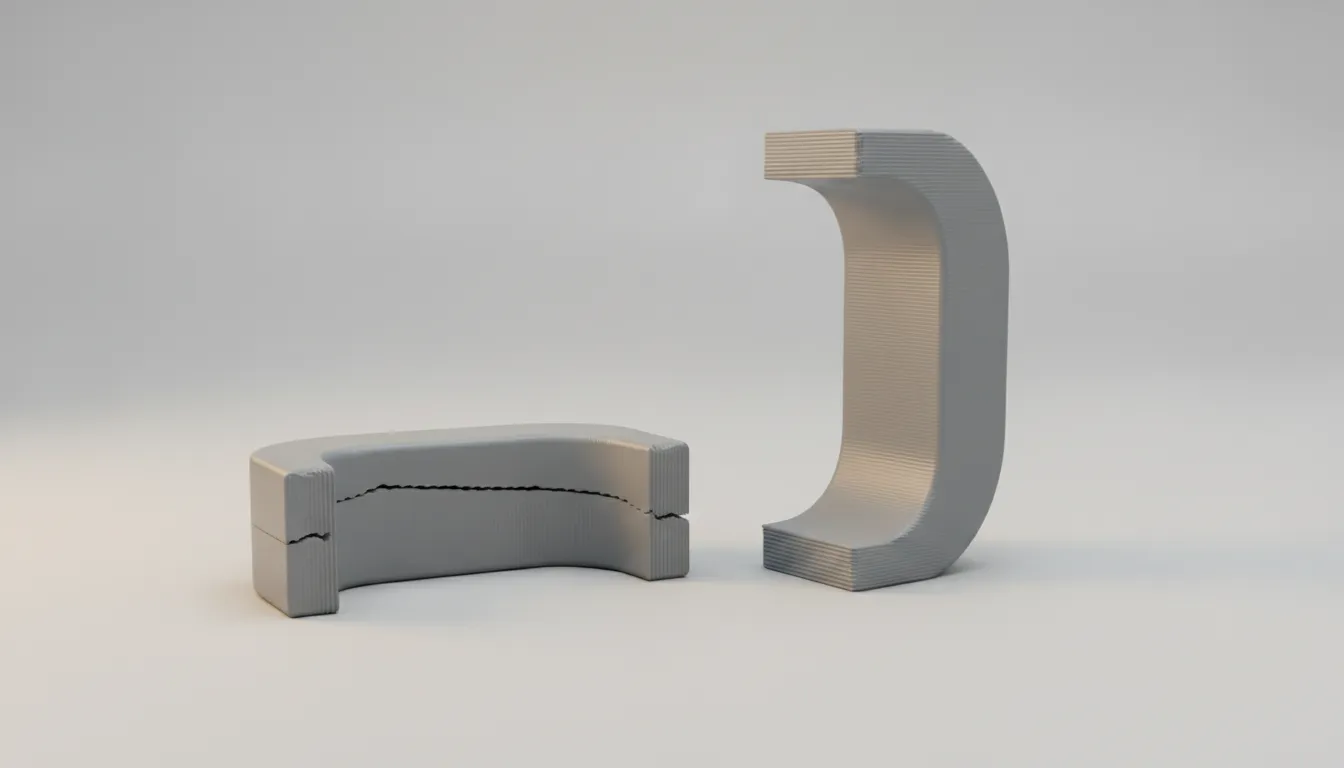
Two identical brackets, printed from the same file, in the same material, on the same printer. One survives years of daily use. The other snaps the first time someone tightens the screw. The only difference: one was lying flat on the print bed and the other was standing up. Print orientation is one of the most underrated decisions in 3D printing, and it affects strength more than most people expect.
In this article we explain why orientation matters, how to read the load on your part, and what to do when a part has to be strong in more than one direction.
Why a 3D print is not the same in every direction
A 3D printed part is built layer by layer. Inside each layer the plastic is laid down in long continuous lines, and those lines are fused into one solid sheet. Between layers, the plastic only bonds where a fresh layer lands on top of a layer that has just cooled. That bond is good, but it is never as strong as the material within a single layer.
This is called anisotropy: the part behaves differently depending on the direction of the force. As a rule of thumb, a print is strongest along the layers and weakest across them. Depending on the material and settings, the strength between layers can be anywhere from half to a bit more than three quarters of the strength within a layer. For brittle materials or a cold print chamber it can be even lower.
You can see it in how a part breaks. A part that fails along a clean, flat line, exactly between two layers, was loaded in its weak direction. A part that tears through the material in a ragged way used its strong direction. When a customer sends us a broken part to replace, the fracture surface usually tells us exactly what went wrong.
Reading the load on your part
Before choosing an orientation, ask one question: in which direction does the force act? A part rarely carries load evenly, so look for the critical spot. It is usually where a part is bent, pulled or pushed, such as the root of a hook, the neck of a bracket or the base of a clip.
Take an L-shaped bracket that carries a weight on its horizontal arm. The bending force tries to open up the corner. If you print the bracket standing up, the layers run horizontally through that corner, so the bend pulls the layers apart. If you print it lying on its side, the layers run along the arm and around the corner, and the same load is carried by the strong direction. The second version can hold far more weight, even though it looks identical.
The same logic applies to a hook, a handle or a snap-fit clip. Imagine the layers as the pages of a book: it is easy to peel a page off, but very hard to tear a page in half. Orient the part so that the load tries to tear pages, not peel them. Our guide to designing for 3D printing shows how to build this thinking into a design from the start.
Orientation also affects more than strength
Strength is not the only thing that changes when you rotate a part. Orientation also decides where the visible layer lines appear, how smooth curved surfaces look, how accurate holes and shafts turn out, and how many supports are needed.
Round holes are a good example. A hole that runs vertically through the print is built from stacked rings and comes out nicely round. A hole that runs horizontally is built from stacked lines of different length, so it comes out slightly oval and may need a little reaming. If a hole has to fit a bearing or a pin, that can outweigh any strength argument. Our article on tolerances and accuracy goes deeper into what you can expect.
Supports are the other trade-off. The strongest orientation sometimes has big overhangs that need support material, which leaves marks on the surface and costs extra time to remove. In that case we weigh both options with you: sometimes a slightly less strong orientation with a cleaner surface is the better choice, and sometimes it is worth the extra post-processing. We describe what finishing is possible in our guide to post-processing 3D prints.
When a part must be strong in several directions
Some parts take load from every side, and no single orientation fixes that. There are a few practical ways around it.
The first is to change the design. Adding a fillet in the inside corner, making a thin neck thicker, or adding a rib can spread the load over more material, so the weak direction no longer decides the outcome. A small radius of just a few millimetres often makes a bigger difference than switching material.
The second is the material. Tougher materials such as nylon and polycarbonate bond better between layers and tolerate impact far better than brittle ones. If the part has to survive real use, our articles on nylon and polycarbonate explain when the extra cost is worth it. More wall lines and a higher infill also help, as described in our guide to choosing the infill percentage.
The third option is to split the part. A complex bracket can be printed as two pieces, each in its best orientation, and joined with screws, threaded inserts or adhesive. This can be stronger than one piece printed in a compromise orientation, and it often prints cleaner as well.
A quick checklist before you order
You do not have to be an engineer to get this right. A few questions are enough to point us in the right direction:
- Which direction does the main force act in, and is it a steady load or a sudden impact?
- Which surfaces must be smooth, and which holes need to fit something?
- Where will the part be used: indoors, outdoors, warm or cold?
Send us the answers together with your file, and we pick the orientation, material and settings that fit. If you tell us a part keeps breaking, a photo of the break is often enough for us to see what is going on.
Get parts that last
At 3Dennis we choose the print orientation for every order based on what the part has to do, not on what is fastest to print. Do you have a part that needs to carry real load, or a part that keeps breaking? Send us your file or a photo via our contact form, add a short note about how it is used, and we come back with advice and a clear quote. See our services for the materials and finishes we offer.
Keep reading
3D Printing Tolerances and Accuracy: What to Expect
How accurate is FDM 3D printing? Learn typical tolerances, factors affecting precision, and how to design parts for the best possible fit.
3D Printing File Formats: STL, STEP or 3MF Explained
STL, STEP, 3MF or OBJ: which file should you send for a 3D print? Learn the differences, common export mistakes, and how to get an accurate quote fast.
Threaded Inserts in 3D Prints: Professional Strength Connections
Learn how brass heat-set inserts transform your 3D printed parts into professional-grade components with durable, reusable threaded connections.
Need help with your project?
Contact us for custom 3D prints or B2B services.